Lost your important Word document? Don’t panic, we’ve got you covered! In this article, we will explore the latest methods to recover unsaved or deleted Word documents in 2023. So, breathe easy and let’s dive into the world of data retrieval to save the day!
Searching for AutoRecover and Backup Files
To search for AutoRecover and backup files in Microsoft Word, follow these steps:
1. Open Microsoft Word on your computer.
2. Go to the “File” tab in the top menu.
3. Select “Open” from the drop-down menu.
4. In the file explorer window, navigate to the location where you last saved the document.
5. Look for files with the extension “.asd” or “.wbk” for AutoRecover and backup files, respectively.
6. If you find the desired file, double-click on it to open and recover your unsaved or deleted document.
7. If you can’t find the file in the original location, try checking the recycle bin on your computer.
8. If the document was permanently deleted or not in the recycle bin, you may need to use data recovery software to recover the file.
Remember to regularly save your documents to avoid any potential data loss.
Checking the Recycle Bin for Recovered Word Documents
- Open the Recycle Bin by double-clicking on its icon located on the desktop.
- Once the Recycle Bin window opens, look for the recovered Word documents that may have been accidentally deleted or unsaved.
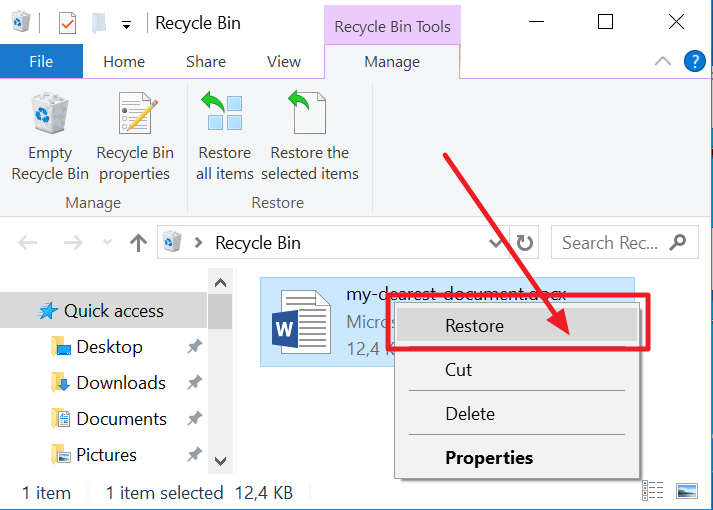
- If you find the desired Word document(s), right-click on it and select the “Restore” option to move it back to its original location.
- If you cannot find the recovered Word documents in the Recycle Bin, proceed to the next repair step.
Restarting Word to Open AutoRecover Files
To restart Word and open AutoRecover files, follow these steps:
1. Close any open Word documents.
2. Open Word and click on the “File” tab in the top left corner.
3. Select “Options” from the dropdown menu.
4. In the Word Options window, click on “Save” in the left-hand menu.
5. Under the “Save documents” section, check the box that says “Save AutoRecover information every X minutes” (X represents the number of minutes you want).
6. Click “OK” to save the changes.
7. If Word unexpectedly closes or crashes, reopen it.
8. A Document Recovery pane should appear on the left side of the screen.
9. Select the document you want to recover and click on the “Open” button.
10. Word will open the recovered document, allowing you to continue where you left off.
Remember to save your recovered document to avoid losing any changes.
python

from docx import Document
def read_word_document(filepath):
doc = Document(filepath)
content = []
for paragraph in doc.paragraphs:
content.append(paragraph.text)
return "\n".join(content)
# Example usage
file_path = "path/to/your/word/document.docx"
recovered_text = read_word_document(file_path)
print(recovered_text)
This code uses the `Document` class from the `python-docx` library to read the content of a word document. It loops through each paragraph in the document and extracts the text, which is then joined together using newline characters (“\n”) and returned as a single string.
Please note that this code assumes the file path provided is a valid word document in the `.docx` format. If you’re working with different file formats or need to handle images, tables, or other document elements, you would need to modify the code accordingly or consider using more advanced libraries or tools specifically designed for document recovery.
Tips on Preventing Word Files from Being Deleted or Unsaved
To prevent Word files from being deleted or unsaved, follow these tips:
1. Enable Autosave: In Microsoft Word, go to the “File” tab, select “Options,” and click on “Save.” Check the box next to “Save AutoRecover information every X minutes” and set the desired interval.
2. Use OneDrive or Microsoft 365: Save your Word files to the cloud using OneDrive or Microsoft 365. This ensures that your documents are automatically backed up and can be accessed from any device.
3. Regularly backup your files: Create a habit of manually backing up your Word files to an external hard drive, remote backup service, or another storage device. This provides an additional layer of protection.
4. Enable version history: If you use OneDrive or SharePoint, enable version history to keep track of changes and easily restore previous versions of your Word files.
5. Be cautious of malware and viruses: Install reliable antivirus software and keep it up to date to protect your computer from malware that can corrupt or delete your Word files.
Remember, accidents happen, and files can still get permanently deleted or corrupted. If that happens, consider using data recovery software or reaching out to a professional service for assistance.
(Note: These tips are applicable to both Windows and Mac operating systems, including Windows 10 and Word 2007 for Windows, as well as Mac OS and Word for Mac.)
How to Recover Deleted Word Documents via Backup
To recover deleted Word documents via backup, follow these steps:
1. Open the folder where your Word documents are stored.
2. Right-click on the folder and select “Properties” from the context menu.
3. In the Properties window, navigate to the “Previous Versions” tab.
4. Here, you will see a list of previous versions of the folder.
5. Select the most recent version before the document was deleted.
6. Click on the “Restore” button to recover the folder and its contents.
7. Once the folder is restored, open it and locate your deleted Word document.
8. Double-click on the document to open it in Microsoft Word.
9. If the document appears corrupted or unreadable, try using the “Open and Repair” feature in Word.
10. To prevent accidental deletion in the future, regularly back up your Word documents to an external hard drive or a cloud storage service like OneDrive.
Remember to save your recovered document under a new name to avoid overwriting any existing files.
How to Recover Deleted Word Documents via Previous Windows Versions
To recover deleted Word documents via previous Windows versions, follow these steps:
1. Open the folder that previously contained the deleted Word document.
2. Right-click on the folder and select “Restore previous versions” from the context menu.
3. A list of previous versions will appear. Select the version that you want to restore from.
4. Click on the “Restore” button to recover the deleted Word document.
5. If the document is still not visible, try searching for it using the Windows Search feature.
6. If you are using Windows 10, you can also try using the “File History” feature to recover the deleted Word document.
7. In Word 2007 or later versions, you can check the “AutoRecover” option to automatically save and recover unsaved documents.
8. For Mac users, the process may vary. In Word for Mac, go to the “Word” menu, select “Preferences,” and then click on “File Locations.” From there, you can manage your document recovery options.
9. Remember to regularly save your Word documents to prevent accidental deletion or loss.
By following these steps, you can easily restore deleted Word documents and minimize the risk of losing important files.
How to Recover Deleted Word Documents via Command Prompt
If you’ve accidentally deleted a Word document on your computer, you may be able to recover it using the Command Prompt.
Here’s how to do it:
1. Open the Command Prompt by pressing the Windows key + R, typing “cmd,” and pressing Enter.
2. Navigate to the location where the deleted Word document was saved using the “cd” command.
3. Once you’re in the correct directory, type “attrib -h -r -s /s /d *” and press Enter. This will unhide all hidden files and folders in that location.
4. Look for the recovered Word document, which should now be visible. If you find it, copy it to a new location to prevent accidental deletion in the future.
Remember, this method may not work for all scenarios, especially if the document has been overwritten or is severely corrupted. It’s always a good idea to regularly back up your important files to avoid data loss.
How to Recover Deleted Word Documents via System Restore
To recover deleted Word documents via System Restore, follow these steps:
1. Open the Start menu and search for “System Restore” to access the System Restore tool.
2. Select “Create a restore point” from the search results.
3. In the System Protection tab, click on “System Restore” and then “Next” to proceed.
4. Choose a restore point that predates the deletion of your Word documents and click “Next.”
5. Review the selected restore point and click “Finish” to initiate the restoration process.
6. Your computer will restart, and the selected restore point will be applied.
7. After the system restarts, open Microsoft Word.
8. Go to the “File” tab and select “Manage Document.”
9. Click on “Recover Unsaved Documents” to access the AutoRecover feature.
10. Look for your deleted Word documents in the list of recovered files.
Remember to regularly save your documents and utilize features like AutoSave and AutoRecover to prevent data loss.
How to Recover Deleted Word Documents via System Image Recovery
To recover deleted Word documents via System Image Recovery, follow these steps:
1. Boot your computer using the installation media or recovery drive for your version of Microsoft Windows.
2. Choose your language preferences, then select “Repair your computer.”
3. In the System Recovery Options, select “System Image Recovery.”
4. Choose the target operating system, then select “Next.”
5. Select the system image you want to use for recovery, then select “Next.”
6. Review the selected image and make sure it includes the Word documents you want to recover.
7. Select “Finish” to start the recovery process.
8. Wait for the recovery process to complete, and then restart your computer.
9. After your computer restarts, you should find your recovered Word documents in their original location.
Remember to regularly back up your important files to prevent data loss. Consider using Acronis Cyber Protect Home Office or a remote backup service for added protection.
How to Recover Deleted Word Documents via a Third-Party Backup Solution
To recover deleted Word documents, you can rely on a third-party backup solution like Acronis Cyber Protect Home Office. Follow these steps to retrieve your lost files:
1. Launch Acronis Cyber Protect Home Office.
2. Navigate to the “Backup” tab.
3. Click on “Recover Files” or a similar option.
4. Select the location where your Word documents were previously stored.
5. Choose the appropriate backup version or date.
6. Locate the deleted Word documents in the backup list.
7. Select the files you want to recover and click on the “Restore” button.
8. Specify the destination folder for the recovered files.
9. Wait for the recovery process to complete.
10. Once finished, you can access your recovered Word documents.
Remember to regularly back up your important files to avoid data loss in the future.
How to Recover Unsaved Word Documents
To recover unsaved Word documents in Microsoft Word on a Mac, follow these steps:
1. Open Microsoft Word on your Mac and go to the “File” tab in the top menu bar.
2. Select “Manage Document” and then click on “Recover Unsaved Documents” from the dropdown menu.
3. In the “Recover Unsaved Documents” window, you will see a list of unsaved documents. Select the one you want to recover.
4. Click on the “Open” button to open the selected unsaved document.
5. Once the document is open, save it immediately to prevent any future loss.
Remember, Microsoft Word on Mac has an auto-recovery feature that automatically saves your documents at regular intervals. To enable this feature, go to “Preferences” under the Word menu, select “Save,” and make sure the “Save AutoRecover info every” option is checked.
By following these steps, you can easily recover unsaved Word documents and avoid losing important work on your Mac.
How to Search for and Retrieve Word Documents from Temporary Files
How to Search for and Retrieve Word Documents from Temporary Files
Article: Recover Unsaved/Deleted Word Documents in 2023
| Step | Description |
|---|---|
| 1 | Open Windows Explorer or File Explorer. |
| 2 | Navigate to the following location: C:\Users\[Your Username]\AppData\Local\Microsoft\Office\UnsavedFiles |
| 3 | Look for any Word document files with the “.tmp” extension. |
| 4 | Copy the desired “.tmp” file(s) to a different location on your computer. |
| 5 | Change the file extension of the copied file(s) from “.tmp” to “.docx”. |
| 6 | Open the renamed “.docx” file(s) in Microsoft Word to recover your unsaved/deleted content. |