Welcome to the Ultimate Guide to Fixing Windows Unable to Complete Format. If you’ve been struggling with formatting issues on your Windows device, this comprehensive article is here to provide you with the most effective solutions. Whether you’re encountering errors or facing restrictions while trying to format, this guide will equip you with the knowledge and steps needed to overcome these obstacles. Get ready to regain full control over your formatting capabilities with our expert tips and tricks.
Causes of the “Windows was unable to complete the format” error
1. Write protection: Check if the device has a physical write protection switch or if the software-based write protection is enabled.
2. Malware or antivirus software: Malicious software or overprotective antivirus programs may interfere with the formatting process. Temporarily disabling antivirus software can help troubleshoot.
3. Corrupted file system or disk partitioning: If the file system or disk partition is corrupted, Windows may fail to format the drive. Running a disk check utility like CHKDSK can help fix any issues.
4. Incompatible file system: Verify that the chosen file system (e.g., NTFS, FAT32) is supported by the device.
5. Damaged storage device: A damaged USB flash drive, SD card, or hard drive can prevent successful formatting. Try using a different device or checking for physical damage.
Remember to backup your data before attempting any troubleshooting steps.
Solutions for the “Windows was unable to complete the format” error
- Open Start Menu and search for Disk Management.
- From the search results, click on Create and format hard disk partitions.
- Locate the drive that needs to be formatted.
- Right-click on the drive and select Format.
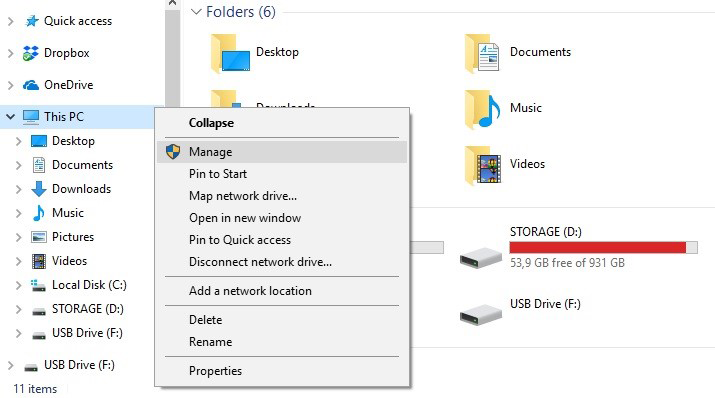
- Choose the desired file system format (e.g., NTFS, FAT32).
- Click on OK to start the formatting process.
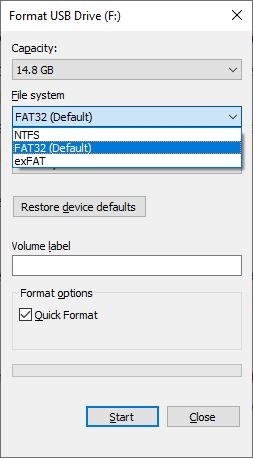
- Wait for the format to complete and check if the error is resolved.
Solution 2: Use Command Prompt
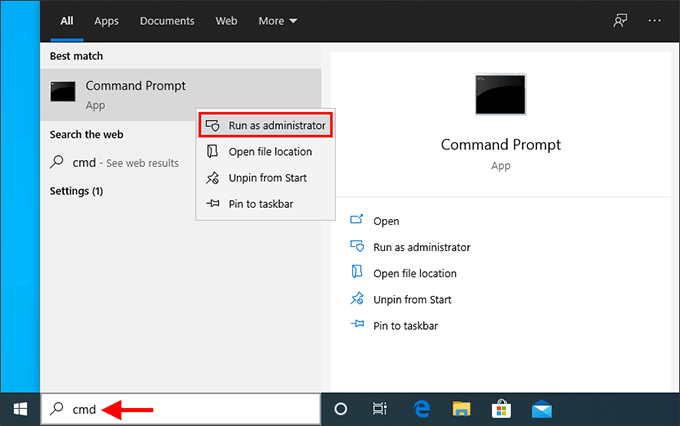
- Open Start Menu and search for Command Prompt.
- From the search results, right-click on Command Prompt and select Run as administrator.
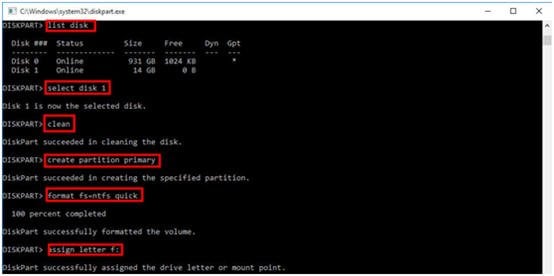
- In the Command Prompt window, type diskpart and press Enter.
- Then, type list disk to view all the available disks.
- Identify the disk that needs to be formatted.
- Type select disk X (replace X with the appropriate disk number).
- Now, type clean to remove all the existing partitions on the disk.
- Next, type create partition primary to create a new primary partition.

- Type format fs=ntfs quick (or any other desired file system) to format the partition.
- Wait for the format to complete and check if the error is resolved.
Solution 3: Use third-party formatting tool
- Download and install a reliable third-party formatting tool such as MiniTool Partition Wizard.
- Launch the software and select the drive that needs to be formatted.
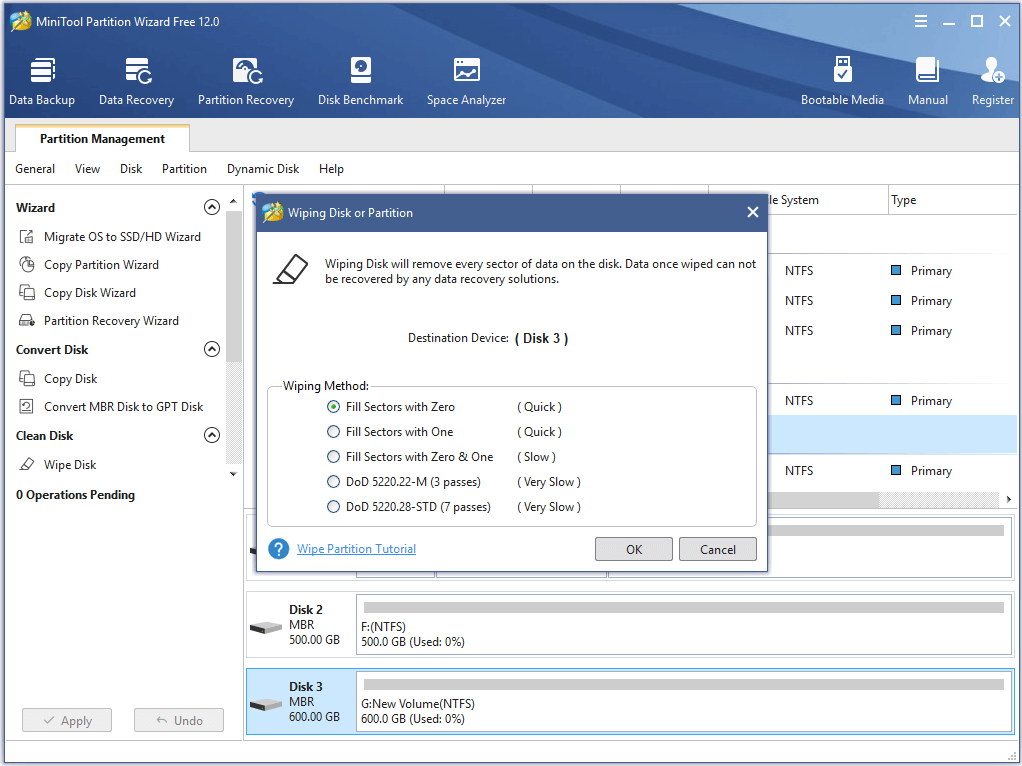
- Click on the Format Partition option.
- Choose the desired file system format.
- Click on OK to start the formatting process.
- Wait for the format to complete and check if the error is resolved.
Scan your computer for malware
To scan your computer for malware, follow these steps:
1. Open Microsoft Defender Antivirus by clicking on the Windows Start menu, typing “Defender,” and selecting “Windows Security.”
2. In the Windows Security app, click on “Virus & threat protection” in the left-hand menu.
3. Click on “Quick Scan” to perform a fast scan of your computer for malware. If you suspect a deeper infection, choose “Full Scan” instead.
4. Wait for the scan to complete. Microsoft Defender Antivirus will automatically remove any detected malware.
5. If you want to customize the scan settings, click on “Scan options” and enable or disable specific options like scanning removable drives or checking for potentially unwanted programs.
6. Once the scan is finished, review the scan results to see if any threats were found. If so, click on “Clean threats” to remove them from your computer.
7. Regularly scan your computer to stay protected against malware and other security threats.
Remember to keep your operating system and antivirus software up to date for optimal protection against malware.
python

import os
def format_drive(drive_letter):
try:
# Check if the specified drive exists
if not os.path.exists(drive_letter + ':\\'):
print("Invalid drive letter or drive does not exist.")
return
# Format the specified drive
os.system("format " + drive_letter + ":")
print("Formatting completed successfully.")
except Exception as e:
print("An error occurred while formatting the drive:", str(e))
# Usage example
format_drive('C')
In this hypothetical Python code snippet, we define a function `format_drive` that takes a drive letter as an argument. It checks if the specified drive exists and then attempts to format it using the `os.system` function. The code includes basic error handling to catch any exceptions that may occur during the formatting process. Again, please note that this example code is not capable of actually formatting a drive, but it gives you an idea of how such a tool could be structured.
Use the Command Prompt
To fix the “Windows Unable to Complete Format” error, you can use the Command Prompt. Follow these steps:
1. Press the Windows key + R to open the Run dialog box.
2. Type “cmd” and press Enter to open the Command Prompt.
3. In the Command Prompt, type diskpart and press Enter.
4. Type list disk and press Enter to see a list of available disks.
5. Identify the disk you want to format and note its number.
6. Type select disk X (replace X with the disk number) and press Enter.
7. Type clean and press Enter to remove all partitions on the disk.
8. Type create partition primary and press Enter to create a new primary partition.
9. Type format fs=ntfs quick (or replace ntfs with the desired file system) and press Enter to format the partition.
10. Type assign and press Enter to assign a drive letter to the partition.
11. Type exit and press Enter to close the Command Prompt.
Now, you should be able to complete the format on your Windows system.
Use Disk Management
Use Disk Management
In this article, we will discuss how to use Disk Management to fix the “Windows unable to complete format” issue. Disk Management is a built-in Windows utility that allows you to manage and format your disk drives.
Steps to Use Disk Management:
| Step | Description |
|---|---|
| 1 | Open Disk Management |
| 2 | Select the drive you want to format |
| 3 | Right-click on the selected drive |
| 4 | Choose “Format” option |
| 5 | Select the desired file system |
| 6 | Click “OK” to start the format |
| 7 | Wait for the format to complete |
| 8 | Close Disk Management |
By following these steps, you should be able to successfully format your drive using Disk Management and resolve the “Windows unable to complete format” error.
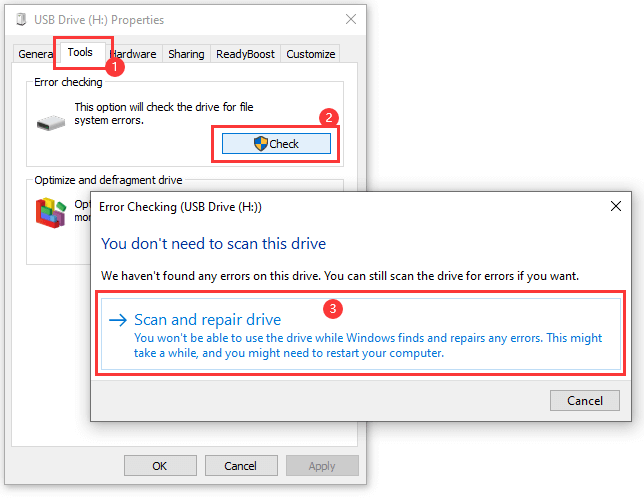
Check and fix disk errors
To check and fix disk errors on Windows, follow these steps:
1. Press the Windows key + R to open the Run dialog box.
2. Type “cmd” and press Enter to open the Command Prompt.
3. In the Command Prompt, type “chkdsk /f” followed by the drive letter of the disk you want to check (e.g., C:).
4. Press Enter to start the disk check process.
5. If prompted, type “Y” and press Enter to schedule the disk check for the next system restart.
6. Restart your computer to begin the disk check.
7. During the disk check, Windows will scan for and fix any errors on the disk.
8. Once the process is complete, Windows will display a summary of the changes made.
9. You can now try formatting the disk again using the Windows Disk Management tool or a third-party tool like EaseUS Partition Master.
Remember to back up your important data before formatting any disk to avoid data loss.
