Introducing a Seamless Transition: Embrace the Power of Online Connectivity in Outlook
Offline Options for Outlook Users
When working offline in Outlook, there are several options available to users.
To switch to working offline, click on the “Send/Receive” tab in the ribbon, then click on the “Work Offline” button. This will disconnect your Outlook from the mail server, allowing you to work without a network connection.
To switch back to working online, simply click on the “Work Offline” button again.
While working offline, you can still access all of your email accounts and perform tasks such as reading, composing, and deleting messages. Any changes made while offline will be synchronized with the mail server once you reconnect.
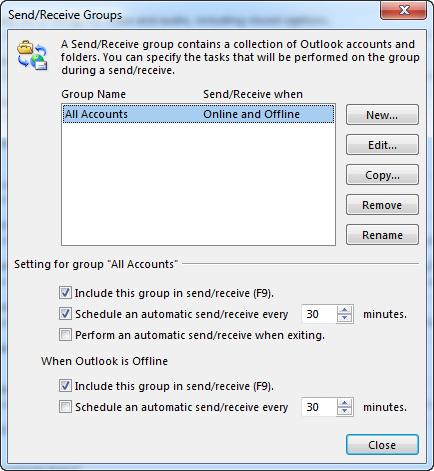
To change the offline settings, go to “File” > “Options” > “Advanced” > “Send/Receive” and click on the “Send/Receive Groups” button.
Note that working offline can help save on connection charges and provide flexibility in areas with unreliable network connections.
For more information and troubleshooting solutions, visit the Microsoft support article at [https://support.office.com/en-us/article/work-offline-in-outlook-f3a1251c-6dd5-4208-aef9-7c8c9522d633].
Maximizing Efficiency with Offline Mode
Maximize efficiency with Offline Mode in Outlook by utilizing the powerful features available. When working without a network connection, switch to offline mode to access your emails, folders, and other Outlook features seamlessly. With Offline Mode, you can continue to read and compose messages, manage your calendar, and perform other tasks without worrying about connection charges or network availability.
To enable Offline Mode, simply click the “Work Offline” button in the ribbon or go to the “File” tab, select “Change Status”, and click “Work Offline”. The status bar will indicate that you are in Offline Mode, providing a visual cue. When you’re ready to reconnect, click the same button or follow the same steps to switch back to online mode.
Offline Mode is especially beneficial for users with slow or intermittent network connections, ensuring uninterrupted productivity. Take advantage of this flexibility and enjoy the convenience of working offline in Outlook. For more information and troubleshooting tips, visit the Microsoft support page at support.office.com.
Configuring Outlook for Offline Work
To configure Outlook for offline work, follow these steps:
1. Open Outlook 2016 and click on the “File” tab.
2. Select “Account Settings” and then choose “Account Settings” again from the drop-down menu.
3. In the Account Settings window, select your Exchange email account and click on the “Change” button.
4. Check the box that says “Use Cached Exchange Mode” and click “Next.”
5. Adjust the slider to choose the amount of mailbox data you want to keep offline. A higher setting will allow you to access more data while offline.
6. Click “Finish” and then “Close” to save your settings.
7. To confirm that you’re working offline, look for the “Work Offline” or “Working Offline” button text in the Outlook window’s status bar.
8. When you’re ready to switch back to online mode, simply click the “Work Offline” or “Working Offline” button again.
For more detailed instructions and troubleshooting solutions, refer to this article: [link to the Microsoft support page].
Managing Offline Folders and Content
- Close Outlook.
- Open the Control Panel.
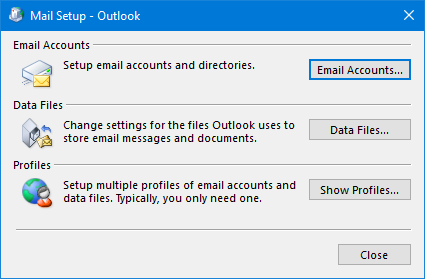
- Click on “Mail” or “Mail (32-bit)”.
- In the Mail Setup – Outlook window, click on “Email Accounts”.
- Select the email account that is associated with the offline folders.
- Click on “Change”.
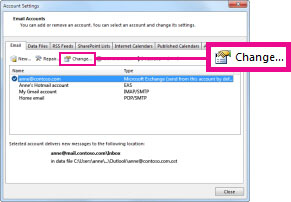
- Under Offline Settings, uncheck the box that says “Use Cached Exchange Mode”.
- Click on “Next” and then “Finish”.
- Open Outlook again.
- Repeat steps 2-7 to enable Cached Exchange Mode.
Repair Method 2: Clearing the Offline Items
- Close Outlook.
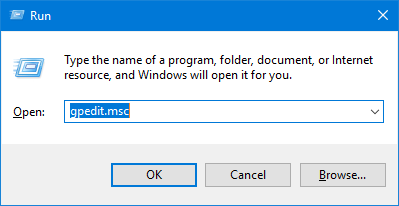
- Press Windows Key + R to open the Run dialog box.
- Type “%LOCALAPPDATA%\Microsoft\Outlook\” and press Enter.
- In the folder that opens, locate the file with the .ost extension.
- Right-click on the .ost file and select “Delete”.
- Open Outlook again.
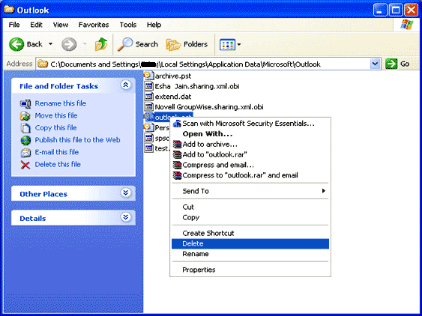
- Outlook will automatically recreate the .ost file.
Repair Method 3: Checking the Offline Folder Settings
- Close Outlook.
- Press Windows Key + R to open the Run dialog box.
- Type “control panel” and press Enter.
- In the Control Panel, click on “Mail” or “Mail (32-bit)”.
- In the Mail Setup – Outlook window, click on “Email Accounts”.
- Select the email account that is associated with the offline folders.
- Click on “Change”.
- Ensure that the “Use Cached Exchange Mode” box is checked.
- Click on “Next” and then “Finish”.
- Open Outlook again.