Unraveling the Mysteries of DNS_PROBE_FINISHED_BAD_CONFIG
Understanding the DNS_PROBE_FINISHED_BAD_CONFIG Error
If you are encountering the DNS_PROBE_FINISHED_BAD_CONFIG error in Google Chrome, it means there is a problem with your DNS configuration. This error message indicates that Chrome is unable to reach the DNS server to resolve the website address you are trying to access.
To fix this error, you can try the following steps:
1. Check your internet connection: Make sure you have a stable internet connection and that your device is connected properly.
2. Restart your router: Sometimes, the issue can be resolved by simply restarting your router. Power off your router, wait for a few seconds, and then power it back on.
3. Flush DNS cache: Open the Command Prompt (Windows) or Terminal (Mac) and enter the command “ipconfig/flushdns” to clear the DNS cache.
4. Reset DNS settings: In the network settings of your device, reset your DNS server settings to the default or try using a different DNS server, such as Google DNS (8.8.8.8).
If these steps do not resolve the issue, it could be a more complex configuration problem. In such cases, it is recommended to seek further assistance or consult a professional.
Common Causes of the DNS_PROBE_FINISHED_BAD_CONFIG Error
- Open the Command Prompt by pressing Windows Key + R and typing cmd. Press Enter to open the Command Prompt.
- In the Command Prompt, type ipconfig /flushdns and press Enter. This will flush the DNS resolver cache.
- Type netsh int ip reset and press Enter. This will reset the TCP/IP stack.
- Restart your computer for the changes to take effect.
Change DNS Server Settings
- Right-click on the network icon in the system tray and select Open Network & Internet settings.
- In the Network & Internet settings, click on Change adapter options.
- Right-click on your active network connection and select Properties.
- Select Internet Protocol Version 4 (TCP/IPv4) and click on Properties.
- Choose the option Use the following DNS server addresses.
- Enter 8.8.8.8 as the preferred DNS server and 8.8.4.4 as the alternate DNS server (these are Google’s public DNS servers).
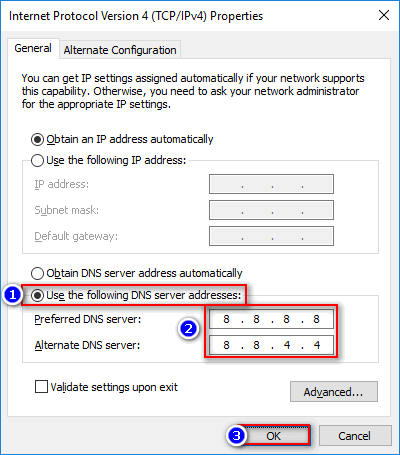
- Click OK to save the changes.
Disable Proxy Settings
- Press Windows Key + R to open the Run dialog box.
- Type inetcpl.cpl and press Enter to open the Internet Properties window.

- In the Internet Properties window, go to the Connections tab and click on LAN settings.
- Uncheck the box that says Use a proxy server for your LAN.
- Click OK to save the changes.
Update Network Drivers
- Press Windows Key + X and select Device Manager.
- In the Device Manager, expand the Network adapters category.
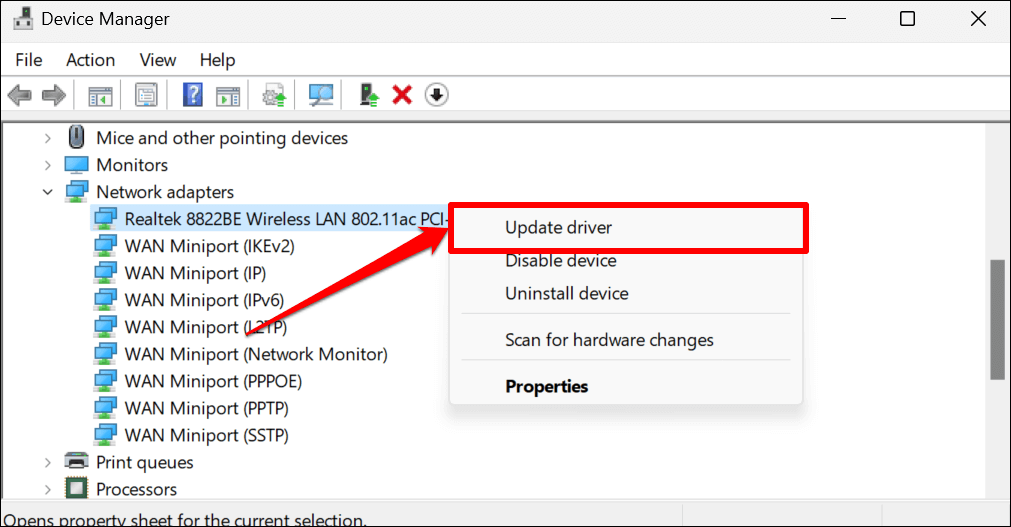
- Right-click on your network adapter and select Update driver.
- Choose the option to Search automatically for updated driver software.
- Follow the on-screen instructions to complete the driver update process.
- Restart your computer for the changes to take effect.
Methods to Fix the DNS_PROBE_FINISHED_BAD_CONFIG Error (7 Ways)
| Method | Description |
|---|---|
| Method 1 | Flush DNS and Reset TCP/IP |
| Method 2 | Reset Network Settings |
| Method 3 | Change DNS Server Addresses |
| Method 4 | Disable Proxy Settings |
| Method 5 | Check Firewall and Antivirus Settings |
| Method 6 | Update Network Drivers |
| Method 7 | Reset Chrome Flags |
Restarting Your Router
Restarting your router can often resolve DNS_PROBE_FINISHED_BAD_CONFIG errors. This error code indicates a DNS configuration issue, which can prevent your web browser from accessing webpages.
To restart your router, follow these steps:
1. Locate your router’s power cable and unplug it from the power source.
2. Wait for at least 10 seconds to ensure the router fully powers down.
3. Plug the power cable back into the router and wait for it to fully restart.
4. Once the router has restarted, try accessing the website again.
If the issue persists, you may need to troubleshoot further or contact your Internet Service Provider for assistance. Keep in mind that other factors, such as connectivity issues or a DNS server outage, could also contribute to the error.
Clearing Your Browser Cache
To clear your browser cache and fix the DNS_PROBE_FINISHED_BAD_CONFIG error, follow these steps:
1. Open your web browser.
2. Press Ctrl+Shift+Delete (Windows) or Command+Shift+Delete (Mac) to open the clear browsing data window.
3. Make sure the “Cached images and files” option is selected.
4. Click on the “Clear data” or “Clear browsing data” button to clear the cache.
5. Restart your web browser.
6. Try accessing the webpage again to see if the error is resolved.
Clearing your browser cache can help resolve DNS configuration issues and refresh the connection between your browser and the web server. This can be a common solution for various browser-related issues, including DNS_PROBE_FINISHED_BAD_CONFIG.
If the error persists, you may need to check your DNS settings or contact your internet service provider for further assistance. Remember to always keep your browser and operating system up to date to avoid potential connectivity issues.
Flushing the DNS Cache and Renewing Your IP Address
To fix the “DNS_PROBE_FINISHED_BAD_CONFIG” error, you can try flushing the DNS cache and renewing your IP address. These steps can help resolve configuration issues that may be causing the error.
1. Open the Command Prompt (Windows) or Terminal (Mac/Linux) with administrator or sudo privileges.
2. To flush the DNS cache, enter the following command and press Enter:
ipconfig /flushdns (Windows)
sudo dscacheutil -flushcache (Mac)
sudo systemd-resolve –flush-caches (Linux)
3. To renew your IP address, enter the following command and press Enter:
ipconfig /release (Windows)
sudo ipconfig set en0 DHCP (Mac)
sudo dhclient -r (Linux)
4. After renewing the IP address, enter the following command to obtain a new IP address:
ipconfig /renew (Windows)
sudo ipconfig set en0 BOOTP (Mac)
sudo dhclient (Linux)
5. Once the commands have been executed, restart your computer and try accessing the webpage again.
By flushing the DNS cache and renewing your IP address, you can often resolve DNS configuration errors and regain access to the desired site.
Manually Changing the DNS Settings
To manually change the DNS settings and fix the DNS_PROBE_FINISHED_BAD_CONFIG error, follow these steps:
1. Open the Command Prompt or Terminal with administrator/sudo privileges.
2. Type “ipconfig /flushdns” and press Enter to clear the DNS cache.
3. Next, enter “ipconfig /release” and press Enter to release the current IP address.
4. Then, type “ipconfig /renew” and press Enter to obtain a new IP address.
5. Now, enter “netsh winsock reset” and press Enter to reset the Winsock catalog.
6. Finally, restart your computer to apply the changes.
By following these steps, you can resolve the DNS_PROBE_FINISHED_BAD_CONFIG error and regain access to webpages. Remember to ensure that you have the necessary administrator/sudo privileges and that you are using the correct URL or website address. If the error persists, consider checking your DNS server configuration or contacting your network administrator for further assistance.
Deleting Temporary Files
To delete temporary files and fix the DNS_PROBE_FINISHED_BAD_CONFIG error, follow these steps:
1. Open the Command Prompt or Terminal with administrator/sudo privileges.
2. Type “ipconfig /flushdns” and press Enter. This command will flush the DNS cache, clearing any temporary files that may be causing the error.
3. Restart your computer to ensure the changes take effect.
4. If the error persists, check your DNS server configuration. Make sure the DNS server addresses are correct and that there are no typos or outdated settings.
5. You can also try changing your DNS server to a different one, such as Google’s Public DNS (8.8.8.8 and 8.8.4.4) or Cloudflare’s DNS (1.1.1.1 and 1.0.0.1).
6. If none of the above solutions work, consider contacting your internet service provider or network administrator for further assistance.
Remember, this troubleshooting guide is specific to fixing the DNS_PROBE_FINISHED_BAD_CONFIG error. If you encounter a different DNS error or have a different operating system, the steps may vary.
Disabling Antivirus Software and Firewalls
To fix the “DNS_PROBE_FINISHED_BAD_CONFIG” error, you may need to disable your antivirus software and firewalls temporarily. These security measures can sometimes interfere with your DNS settings, causing the error to occur.
To disable your antivirus software, follow these steps:
1. Open the antivirus program on your computer.
2. Look for an option to disable or turn off the antivirus protection.
3. Click on this option to disable the antivirus temporarily.
Next, you’ll need to disable any firewalls that may be running:
1. Open the Control Panel on your computer.
2. Search for “Windows Defender Firewall” and click on the matching result.
3. In the left-hand menu, click on “Turn Windows Defender Firewall on or off.”
4. Select the option to turn off the firewall for both private and public networks.
5. Click “OK” to save the changes.
Once you have disabled your antivirus software and firewalls, try accessing the website again. If the error persists, you may need to explore other solutions or seek further assistance.
Updating Your Network Drivers
To fix the DNS_PROBE_FINISHED_BAD_CONFIG error, you may need to update your network drivers. Outdated or incompatible drivers can cause connectivity issues and prevent your computer from accessing the internet properly.
Here’s how you can update your network drivers:
1. Press the Windows key + R to open the Run dialog box.
2. Type “devmgmt.msc” and press Enter to open the Device Manager.
3. Expand the “Network adapters” category.
4. Right-click on your network adapter and select “Update driver.”
5. Choose the option to automatically search for updated driver software.
6. If an update is found, follow the on-screen instructions to install it.
7. Restart your computer to apply the changes.
Updating your network drivers can resolve DNS_PROBE_FINISHED_BAD_CONFIG errors caused by outdated or incompatible drivers. If the issue persists, consider contacting your network administrator or internet service provider for further assistance.
Restarting Devices and Network Connections
1. Restart your computer or device by clicking on the “Start” menu, selecting “Restart” or “Shut Down,” and then turning it back on after a few seconds.
2. If you’re using a Wi-Fi connection, try restarting your router by unplugging it from the power source, waiting for 10 seconds, and then plugging it back in. If you’re using an Ethernet connection, unplug the cable from your computer and router, wait for a few seconds, and then reconnect it.
3. Check if other devices connected to the same network are experiencing the same issue. If they are, there may be a network outage or problem with your DNS server. Contact your internet service provider for assistance.
4. If the error message persists, you can try flushing your DNS cache. Open the command prompt or terminal with administrator or sudo privileges, then type “ipconfig /flushdns” (Windows) or “sudo dscacheutil -flushcache” (Mac) and press Enter.
5. Finally, try accessing the website again. If the DNS_PROBE_FINISHED_BAD_CONFIG error still occurs, it could be a problem with the website’s DNS configuration. In such cases, you can try visiting other websites to verify if the issue is specific to that site.
Remember, these troubleshooting steps should help resolve common DNS configuration errors. Don’t panic, as the issue can usually be resolved by following these simple steps.
Resetting Network Settings on Windows or Mac
To reset network settings on Windows or Mac and fix the DNS_PROBE_FINISHED_BAD_CONFIG error, follow these steps:
For Windows:
1. Open the Command Prompt as an administrator.
2. Type “ipconfig /flushdns” and press Enter.
3. Next, type “netsh int ip reset” and press Enter.
4. Restart your computer.
For Mac:
1. Open Terminal.
2. Type “sudo killall -HUP mDNSResponder” and press Enter.
3. Enter your administrator password.
4. Restart your computer.
Resetting network settings can resolve issues with DNS configuration that may be causing the DNS_PROBE_FINISHED_BAD_CONFIG error. It clears the DNS cache and resets network configurations for a fresh start. Remember to restart your computer after completing the steps.
Switching to Alternative DNS Servers
To fix the DNS_PROBE_FINISHED_BAD_CONFIG error, you can switch to alternative DNS servers. Here are the steps to do it:
1. Open the Command Prompt or Terminal with administrator or sudo privileges.
2. Type ipconfig /flushdns and press Enter to clear the DNS cache.
3. Next, enter netsh int ip reset and press Enter to reset the TCP/IP stack.
4. Now, you need to find alternative DNS servers to use. You can search for public DNS servers online or use popular ones like Google DNS (8.8.8.8 and 8.8.4.4) or Cloudflare DNS (1.1.1.1 and 1.0.0.1).
5. Once you have the DNS server IP addresses, go to your network settings and replace the existing DNS server addresses with the new ones.
6. Save the changes and restart your computer.
By switching to alternative DNS servers, you can resolve DNS configuration errors and ensure a smooth browsing experience.
