Welcome to the ultimate guide on Chrome’s powerful pop-up blocker! In this article, we will unravel the secrets behind this handy tool, equipping you with the knowledge to navigate the web smoothly and free from those pesky interruptions. Get ready to say goodbye to unwanted pop-ups as we dive into the depths of Chrome’s pop-up blocker features.
Managing Pop-Up Settings in Chrome
To manage pop-up settings in Chrome, follow these steps:
1. Open Google Chrome on your computer or mobile device.
2. Click on the three-dot menu icon in the top right corner of the browser window.
3. Select “Settings” from the dropdown menu.
4. Scroll down and click on “Privacy and security” in the left sidebar.
5. Under the “Privacy and security” section, click on “Site settings”.
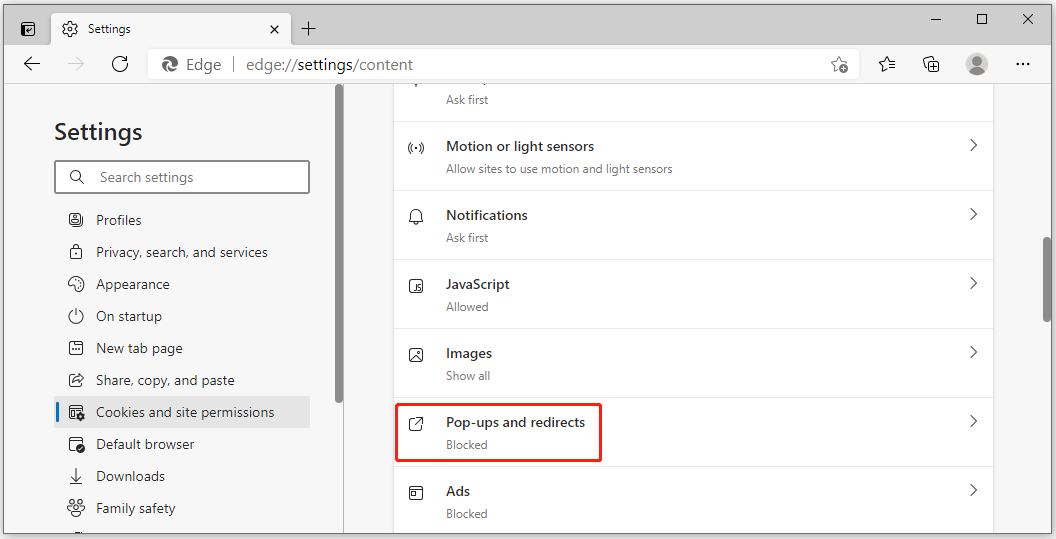
6. Scroll down and click on “Pop-ups and redirects”.
7. To allow pop-ups on specific websites, click on “Add” next to “Allow” and enter the website’s URL.
8. To block pop-ups, make sure the toggle switch next to “Block” is turned on.
9. You can also manage exceptions by clicking on “Add” next to “Allow” or “Block” and entering the website’s URL.
10. Close the settings tab when you’re done.
By managing pop-up settings, you can enhance your browsing experience and protect yourself from unwanted pop-up ads and potential malware.
Configuring Chrome to Block All Pop-Ups
1. Open Google Chrome on your device.
2. Click on the three vertical dots in the top-right corner to open the menu.
3. Select “Settings” from the dropdown menu.
4. Scroll down and click on “Privacy and security.”
5. Under the “Security” section, click on “Site settings.”
6. Scroll down and select “Pop-ups and redirects.”
7. Toggle the switch to block pop-ups.
8. To further customize your settings, click on “Add” next to “Allow,” and enter the website URL you want to allow pop-ups for.
9. Close the settings tab when you’re finished.
Remember, blocking pop-ups can help protect your device from malware and unwanted ads. If you encounter any issues or need more assistance, visit the Google Chrome Help Center for detailed instructions.
Exploring Chrome’s Pop-Up Blocking Features
- Step 1: Open the Chrome browser.
-
Step 2: Access the Chrome settings menu.
- Click on the three vertical dots in the top-right corner of the browser window.
- Select “Settings” from the drop-down menu.

-
Step 3: Navigate to the “Privacy and security” section.
- Scroll down the settings page and click on “Privacy and security” in the left sidebar.
-
Step 4: Locate the “Site settings” option.
- Click on “Site settings” to access the site-specific settings.
-
Step 5: Find the “Pop-ups and redirects” setting.
- Scroll down the site settings page and click on “Pop-ups and redirects”.
-
Step 6: Enable or disable the pop-up blocker.
- To enable the pop-up blocker, toggle the switch to the right.
- To disable the pop-up blocker, toggle the switch to the left.

-
Step 7: Manage exceptions for pop-ups.
- Click on the “Add” button next to “Allow” to add a website to the exceptions list.
- Enter the website address and click “Add” to save the exception.

-
Step 8: Customize additional pop-up settings.
- Click on “Advanced” to access more options for pop-up blocking.
- Adjust the settings according to your preferences.

javascript

// Add an event listener to detect pop-up events

window.addEventListener('beforeunload', function(event) {

  // Display a custom message when a pop-up is blocked

  event.returnValue = 'A pop-up was blocked by your browser.';

});
The above code listens for the `beforeunload` event, which is triggered when the user tries to leave a page, potentially indicating a pop-up is being blocked. However, please note that this code will only work when embedded within a web page and doesn’t override any browser’s built-in pop-up blocking functionality.
Remember to use code responsibly and in accordance with browser policies and user consent.
Understanding the Functionality of Pop-Up Blockers in Chrome
When using Chrome, the pop-up blocker functionality is an important feature to understand and utilize. Pop-up blockers help prevent unwanted pop-up ads from interrupting your browsing experience.
To access the pop-up blocker settings in Chrome, click on the three-dot menu icon in the top-right corner and select “Settings.” From there, scroll down and click on “Advanced” at the bottom. Under the “Privacy and security” section, click on “Site settings” and then “Pop-ups and redirects.”
To disable the pop-up blocker for a specific website, click on the blocked pop-up icon in the address bar and select “Always allow pop-ups from this site.”
If you want to disable the pop-up blocker completely, go back to the “Pop-ups and redirects” settings and toggle the switch to off.
Remember, allowing pop-ups can potentially expose your device to spamming and malicious content, so it’s important to be cautious when adjusting these settings.
