Unlock the potential of your disk partitions with FDISK: the ultimate guide to efficient management of your storage space.
Overview of FDISK
FDISK Overview:
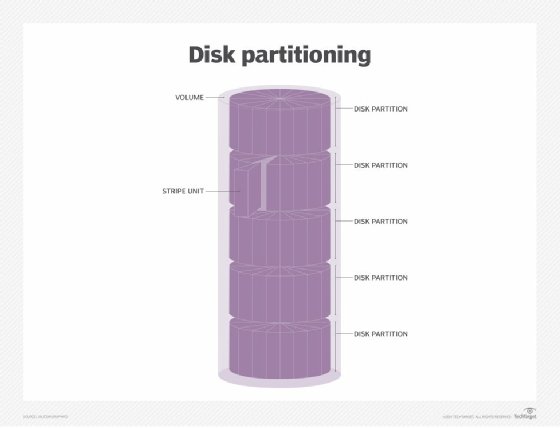
FDISK is a command-line utility used for managing disk partitions on various operating systems, including Windows, Linux, and Ubuntu. It allows users to create, delete, resize, and format partitions on a hard disk.
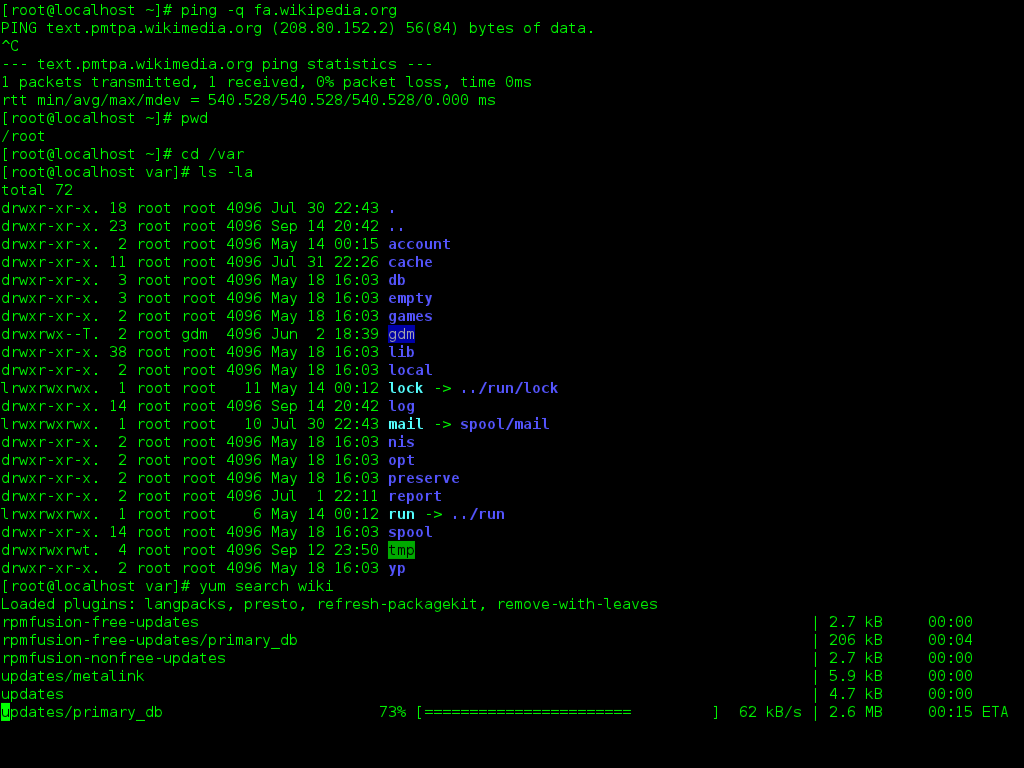
To use FDISK, open a command prompt or terminal and enter the command “fdisk“. This will launch the FDISK utility.
Once in FDISK, you can view the current partition layout of your hard disk and perform various partitioning operations. Use the “list” command to see the existing partitions and their details.
To create a new partition, use the “create” command followed by the desired size and file system type. For example, “create 100GB ext4” will create a new 100GB partition with the ext4 file system.
To delete a partition, use the “delete” command followed by the partition number. For example, “delete 2” will delete partition number 2.
Remember to save your changes by using the “write” command before exiting FDISK.
Note: FDISK commands and syntax may vary slightly depending on the operating system and version you are using.
Usage of FDISK command
The FDISK command is a powerful tool for managing disk partitions on your computer. It allows you to create, delete, and modify partitions to optimize your storage space.
To use the FDISK command, open a command prompt or terminal window and type “fdisk” followed by the name of the disk you want to work with.
Once inside the FDISK interface, you can use commands like “list” to view the current partitions on the disk, “create” to create a new partition, and “delete” to remove an existing partition.
You can also set the boot flag on a partition to make it bootable, or mark a partition as extended to create logical partitions within it.
Remember to save your changes before exiting the FDISK interface.
Using the FDISK command effectively requires understanding concepts like disk geometry, topology, and space calculation. But with practice, you’ll become proficient in managing your disk partitions like a pro.
Manipulating partition tables with FDISK
Partitioning disk drives is an essential task for managing storage on your computer. With FDISK, you can manipulate partition tables effectively. To create a new partition, use the create command followed by the desired size and partition type. To delete a partition, use the delete command followed by the partition number.
Use the set active command to mark a partition as active, which is necessary for booting from it. You can also view the partition table with the display command. FDISK provides a command-line interface that allows you to work with ease, and it is available on various operating systems, including Windows and Linux. Remember to back up your data before making any changes to your disk partitions.
Creating primary partitions
To create primary partitions using FDISK, follow these steps:
1. Open the Command Prompt or Terminal.
2. Type “fdisk” and press Enter to launch the FDISK tool.
3. Select the disk you want to partition. For example, if you want to partition the first hard disk, type “1” and press Enter.
4. Choose the option to create a new partition. This is usually labeled as “n“.
5. Select the partition type. For primary partitions, choose “p“.
6. Specify the size of the partition. You can use different units such as megabytes (M) or gigabytes (G).
7. Repeat steps 4-6 to create additional primary partitions if needed.
8. Save the changes and exit FDISK.
9. Format the newly created partitions using the “format” command.
10. Set the partition as bootable if necessary.
Remember to be cautious when using FDISK as it directly modifies disk partitions. Make sure to back up your data before proceeding.
Creating mixed primary and logical partitions
To create mixed primary and logical partitions using FDISK, follow these steps:
1. Launch FDISK from the command-line interface.
2. Choose the desired hard disk drive to partition.
3. Use the appropriate command to create a primary partition. For example, type “n” and press Enter.
4. Specify the partition size in cylinders, sectors, or bytes.
5. Repeat steps 3 and 4 to create additional primary partitions as needed.
6. Once the primary partitions are created, use the “t” command to set the partition type.
7. Specify the partition number and the desired type code.
8. To create logical partitions within an extended partition, select the “e” command.
9. Specify the size of the logical partition.
10. Repeat steps 8 and 9 to create additional logical partitions as needed.
11. Use the “p” command to view the partition table and verify the changes.
12. Save the changes and exit FDISK.
By following these steps, you can easily create mixed primary and logical partitions using FDISK for efficient disk management.
Examples of FDISK usage
- Step 1: Open the command prompt on your computer.
- Step 2: Type “fdisk” and press Enter to run the FDISK utility.
- Step 3: Identify the disk number or drive letter of the disk you want to partition.
-
Step 4: Select the disk by typing “select disk
” (e.g., “select disk 0”) and press Enter. - Step 5: List the partitions on the selected disk by typing “list partition” and press Enter.
- Step 6: Identify the partition number of the partition you want to modify.
-
Step 7: Select the partition by typing “select partition
” (e.g., “select partition 1”) and press Enter. - Step 8: Use the appropriate FDISK command to perform the desired operation, such as creating a new partition, deleting a partition, or changing the active partition.
- Step 9: Follow the prompts and provide any necessary input to complete the selected operation.
- Step 10: Repeat steps 6-9 for any additional partitions you want to modify.
- Step 11: Exit the FDISK utility by typing “exit” and pressing Enter.
Managing disk sizes with FDISK
To create a new partition, select option 1 and follow the prompts to specify the size and location. Use the SET ACTIVE command to mark the partition as active for booting.
If you need to delete a partition, select option 3 and choose the partition you want to remove. Confirm the deletion when prompted.
For modifying partitions, select option 2 and choose the partition you wish to modify. You can change the size, type, or label of the partition.
Remember to save your changes by selecting option 4 and confirming the write to disk.
Managing disk sizes with FDISK is a powerful tool for organizing your storage efficiently.
Script files for FDISK
To create a script file, simply open a text editor and enter the desired FDISK commands. Each command should be on a separate line.
To run the script file, open a command prompt and navigate to the directory where the script file is located. Then, use the following command:
FDISK /SCRIPT:filename
Replace “filename” with the name of your script file. FDISK will execute the commands in the script file in the order they appear.
Using script files can save time and ensure consistency when managing disk partitions with FDISK. So, take advantage of this feature to streamline your partitioning tasks.
Advantages and limitations of FDISK
- Advantages of FDISK: Efficiently manages disk partitions for optimal storage allocation.
- Allows users to create, delete, and resize partitions on a disk.
- Enables formatting partitions to different file systems, such as FAT32 or NTFS.
- Supports multiple hard disk drives for comprehensive partition management.
- Provides a command-line interface for easy and quick partitioning operations.
- Offers compatibility with various versions of Windows operating systems.
- Allows for marking a partition as active to make it bootable.
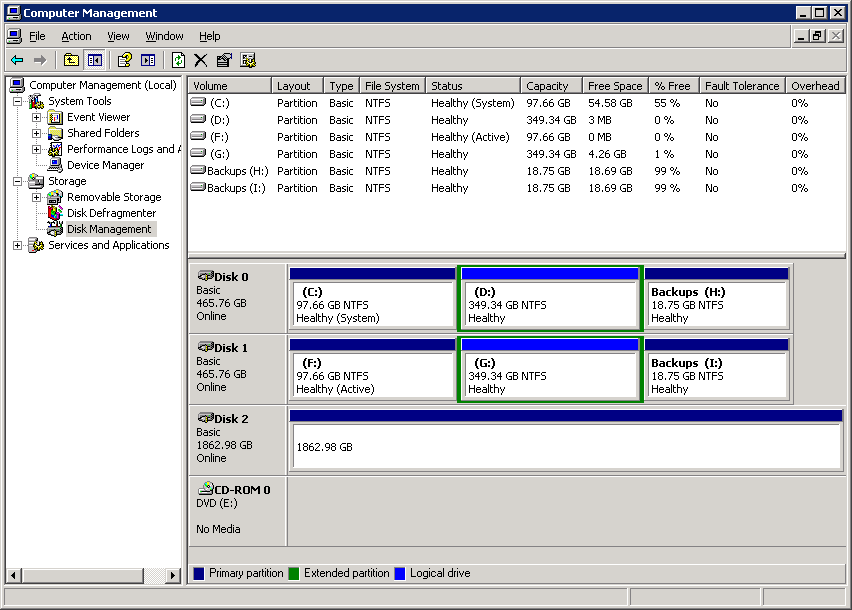
- Enables viewing of partition information, including size, type, and file system.
Limitations of FDISK:
- Lacks a graphical user interface, requiring users to rely on command-line instructions.
- Does not support dynamic disk management or partition resizing without data loss.
- Limited ability to recover lost or corrupted partitions.
- Does not offer advanced features like encryption or advanced disk management options.
- May require expert knowledge to perform complex partitioning tasks.
- Not designed for managing partitions on non-Windows operating systems.

FDISK availability and reporting bugs
FDISK is a powerful tool for managing disk partitions. It is available on most operating systems, including DOS, Ubuntu, and Atari.
To access FDISK, open a command prompt or terminal and type “fdisk“. This will launch the FDISK utility, where you can create, delete, and modify disk partitions.
If you encounter any bugs or issues while using FDISK, it is important to report them to the appropriate support channels. This helps the developers identify and fix the problems, ensuring a smoother experience for all users.
When reporting bugs, provide detailed information about the issue, including the steps to reproduce it, any error messages received, and the operating system and version you are using.
Remember, FDISK is a powerful tool that should be used with caution. Make sure to back up your data before making any changes to disk partitions.